How to Properly Install Secure Hooks
To properly install secure hooks, start by choosing the right type based on the weight of the items you plan to hang. Next, select a sturdy location on your wall, avoiding flimsy surfaces. Gather essential tools like a drill, level, and measuring tape. Clean the wall surface for better adhesion, then mark your installation points. Drill holes, insert anchors if needed, and install the hooks. Finally, test their stability to guarantee safety, and you’ll be ready for more tips on organizing your space!
Choosing the Right Type of Hook
When you’re selecting hooks for your project, it’s vital to evaluate the specific requirements of your space and the items you’ll be hanging. Start by considering the hook materials—metal, plastic, or wood—each offering different durability and aesthetic appeal. For heavier items, like tools or artwork, opt for metal hooks with higher weight capacity. Check the manufacturer’s recommendations to confirm they can handle the loads you plan to hang. If you’re hanging lightweight decor, plastic options might suffice, but always verify their strength. Remember, the right hook not only enhances your freedom to arrange your space but also guarantees safety and stability. Choosing wisely will help you avoid accidents and enjoy your well-organized environment without worry.
Selecting the Appropriate Location
Where should you hang your hooks for maximum effectiveness? Start by identifying ideal wall surfaces like drywall or wood, which offer better support. Avoid hanging hooks on flimsy materials, as they won’t hold well. Next, consider the surrounding obstacles; make certain there’s enough space to easily access your items without interference. For example, don’t place hooks too close to doors or furniture that might block access. Think about the height, too—hanging hooks at eye level often works best. Finally, envision how you’ll use the hooks. Whether it’s for bags, tools, or decorations, ascertain the location allows for easy retrieval and placement. Choosing the right spot can truly enhance your space’s functionality and aesthetic.
Gathering the Necessary Tools
Before you get started with installing secure hooks, it’s vital to gather the right tools to guarantee a smooth process. You’ll need a drill, appropriate drill bits, a level, and a measuring tape—these are essential tool types for the job. Additionally, a stud finder can be invaluable for ensuring that your hooks are anchored properly. Don’t forget safety precautions: wear safety glasses to protect your eyes from dust and debris, and use hearing protection if you’re working in a noisy environment. Gathering these tools beforehand not only saves time but also empowers you to install hooks confidently and effectively, giving you the freedom to create your ideal space without hassle.
Preparing the Wall Surface
Once you’ve gathered all the necessary tools, the next step is to prepare the wall surface for installing secure hooks. Start by using effective surface cleaning methods to remove dust, grease, or any debris that might interfere with the hook’s grip. A damp cloth or a mild cleaner can work wonders, guaranteeing the area is pristine. Next, assess the wall condition; if it’s damaged or uneven, consider applying wall preparation techniques, like patching holes or sanding rough spots. This guarantees a smooth and stable base for your hooks. Taking these steps not only enhances the installation’s success but also gives you the freedom to hang your items confidently, knowing they’re securely in place.
Marking the Installation Points
Before you start installing your hooks, it’s important to choose the right location on the wall. Measure carefully to guarantee your hooks are placed accurately, as this will help them hold weight securely. Take your time here; a little precision now can save you from headaches later.
Choosing Installation Location
Where are you planning to install your secure hooks? The location matters a lot! First, consider the wall types in your space—drywall, concrete, or plaster all affect how well your hooks will hold. You’ll want to choose a spot that can handle the load capacity of the items you plan to hang. For heavier items, verify you’re anchoring into studs or using appropriate wall anchors. Mark your installation points carefully, as this will dictate how secure your hooks will be. Think about accessibility, too; you want to reach your items easily without compromising on aesthetics. Once you’ve found that perfect spot, you’re ready to move onto the next step—getting those hooks installed securely!
Measuring for Accuracy
Getting the measurements right is essential for a successful installation of your secure hooks. Start by using accuracy tools, like a level and tape measure, to guarantee your hooks are placed correctly. Here are some effective measuring techniques to follow:
| Tools | Purpose | Tips |
|---|---|---|
| Tape Measure | Measure distances | Guarantee it’s taut |
| Level | Check horizontality | Use on each hook |
| Pencil | Mark installation points | Make light, clear marks |
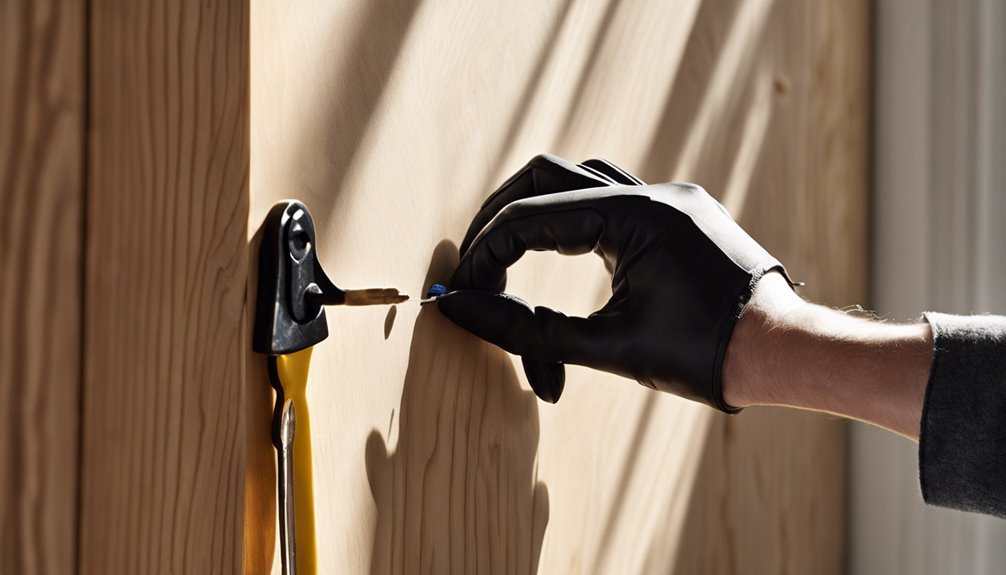
Drilling Holes for Secure Anchoring
As you prepare to install secure hooks, drilling precise holes for anchoring is essential to confirm stability and safety. First, consider your wall material; whether it’s drywall, concrete, or wood will determine the appropriate drill bit types. For drywall, a standard twist bit works well, while masonry requires a carbide-tipped bit. Always check the weight capacity of the hooks and select the right anchor type to match your wall. Mark your drilling points accurately, confirming they align with your measurements. Use a level to avoid crooked hooks. When drilling, apply consistent pressure and avoid forcing the drill. This careful approach will confirm your hooks are not just functional but safe for your space, giving you the freedom to hang your items securely.
Installing the Hooks
Now that you’ve drilled the holes for secure anchoring, it’s time to install the hooks. Depending on the hook types you’ve chosen, the installation techniques may vary slightly, but the process remains straightforward. Follow these steps for a successful installation:
- Insert the Hook: Align the hook with the drilled hole and gently push it in until it’s snug.
- Secure Fasteners: If your hook requires screws or anchors, use a screwdriver or drill to fasten them tightly, ensuring stability.
- Check Alignment: Make sure the hook is level and positioned correctly before finalizing your installation.
Testing the Stability of the Hooks
After installing the hooks, it is vital to test their stability to guarantee they can handle the intended load. Start by gently applying pressure to each hook, gradually increasing the force to assess their grip. Make sure to take into account the weight limits specified by the manufacturer; exceeding these can lead to accidents. For more thorough load testing, hang weights that mimic the intended items, ensuring they’re secure before letting go. If the hooks wobble or show signs of strain, it is best to reassess your installation. Remember, your freedom to hang items safely depends on this important step. Once you’re confident in their stability, you can enjoy the peace of mind that comes with knowing your hooks are up to the task.
References
- https://www.wikihow.com/Install-Screw-Hooks
- https://www.extension.purdue.edu/article/32970
- https://www.hud.gov/program_offices/public_indian_housing/ih/homeownership/eda/hook
- https://www.nssl.noaa.gov/education/svrwx101/
- https://www.cdc.gov/niosh/docs/2000-139/default.html
- https://www.owenscorning.com/en-us/insulation/learning-center/blog/creating-a-secure-hook-installation
- https://www.aisc.org/globalassets/modern-steel/archives/2007/11/installation.pdf
- https://www.fema.gov/sites/default/files/documents/fema_hurricane_safety_guide.pdf